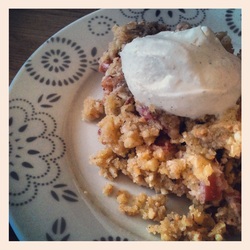
 Rhubarb Crumble with Vanilla Whipped Cream It's rhubarb season here in Sweden and I just couldn't resist trying to make some rhubarb crumble (rabarberpaj). A great thing about rhubarb is that it's naturally low in carbs, making it a great base for a low carb dessert. I was inspired by the recipe found at Swedish Diet's Blog but changed a few ingredients and change the measurements to grams. This pie has lots of nuts in it. I used chopped almonds and hazelnuts to give it a crunchy feeling and a contrast of texture. Admittedly, I found myself chewing alot because of the nuts. That's not necessarily a bad thing, chewing lots makes you feel full faster, so take such a big portion in the beginning. Because there's not sugar or flour, you don't get the same sort of crunchy feeling from the topping. But hey, you won't miss that when you put the whipped cream on it. My husband really liked this so hopefully if you do try it out, it'll be a summer dessert you can enjoy aswell! Rhubarb Crumble3 rhubarb stalks, cut into medium sized cubes (425-450g) 60g chopped almonds (not too small that it's a flour, but not too big either!)50g chopped hazelnuts (again, like the almonds, not too small)100 ml shredded coconut 150 ml almond flour100 ml coconut flour250g melted butter4 tbsp stevia "sugar" (the white stuff, not the green stuff) 1/2 tsp cinnamon1/2 tsp vanilla powder1 tsp baking powder1) Melt the butter with 2 tbsp of Stevia Sugar.2) Preheat the oven to 200 degrees C (390 F) and place the rhubarb pieces into a buttered ovenproof dish.3) Except for the cinnamon and the remaining 2 tbsp of stevia sugar, mix together the dry ingredients in a medium sized bowl. 4) Sprinkle the cinnamon and stevia sugar on top of the rhubarb. 5) Mix the melted butter with the dry ingredients.6) Spread the mixture on top of the rhubarb and bake in the oven for 20 minutes.7) Enjoy with some whipped cream sweetened with stevia and
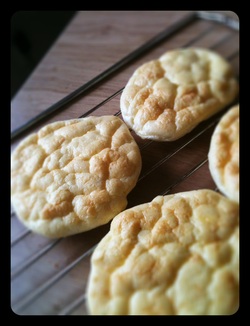 Oopsies straight out of the oven So, you're missing bread. It's understandable. If you've been browsing low carb forums and blogs you're almost bound to have heard of the oopsie. You can do many things with oopsies, use them as a pizza base, as a hamburger bun, you can even use them as part of a dessert by making one large one and using it as a base for a swiss roll. Really, they are THAT versatile. Whilst some may argue that the oopsie roll is the answer to all, that it is not. However, it does make eating low carb easier.The following is the oopsie recipe that I found on the Diet Doctor's Website (it's found closer towards the bottom of the page). The only change that I made to it was add Cream of Tartar, an ingredient that you can't find here in Sweden, but helps when you're whipping egg whites. I've seen it in other oopsie recipes so decided to add it to mine. The results were great. I used it instead of an english muffin to my eggs flourentine today. They're fairly easy to make and are very low carb. I think the next time I make them, they'll be in swiss roll form. Perhaps this evening haha! I'll put a little stevia in it and some shredded coconut, then make some coconut whipped cream and add in some raspberries...yep, I may just have to make that tonight! Oopsies6-8 depending on size3 eggs100g cream cheesea pinch of salt1/8 tsp cream of tartar1/2 tbsp fiberhusk/psyllium husk (can be excluded)1/2 tsp baking powder (can be excluded)1. Separate the eggs, egg whites in one bowl and egg yolks in another.2. Whip the egg whites together with the salt until very stiff. You should be able to turn the bowl over without the egg whites moving.3. Mix the egg yolks and the cream cheese well. Add fiber husk and baking powder if you want (will make the oopsie more like bread).4. Very gently put the egg whites into the yolk mix - try to keep the air in the egg whites. 5. Put 6 large or 8 smalle oopsies on a baking try.6. Bake in the middle of the oven at 150 C (300F) for about 25 minutes - until they turn golden. Can be eaten as bread or used as a hotdog- or hamburger bun. You can also put different kinds of seeds on them before baking them, for instance poppy-, sesame or sunflower seeds. One big oopsie can be used for a swiss roll. Add a generous layer of whipped cream and some berries.
Again, this comes from Get Fit Katie's Low Carb Blog. The original recipe and her talk about it can be found here. I'm very excited about trying these as well. They look so yummy! For those who don't know what Truvia it is Stevia, just a brand name. When I make them myself, I'll put a picture up with this post. LCHF Chocolate Sour Cream Cake Recipe (12 Servings) Ingredients: - 1/2 cup of baking cocoa;
- 1/2 cup of hot water, microwaved for 60 seconds;
- 1/2 cup of soft salted butter;
- 1/2 cup Truvia
- 32 drops of liquid Splenda
- 4 eggs
- 1 tsp vanilla extract
- 3/4 cup coconut flour
- 1 tsp baking soda
- 1/4 tsp baking powder
- 1/4 tsp salt
- 1/2 cup sour cream
Directions: - Preheat oven to 350 degrees.
- Dissolve the cocoa in the hot water and let it steep until it is cool.
- In a large mixing bowl, cream butter and sweeteners until light and fluffy (mixture will still appear somewhat granular because Truvia acts differently than sugar).
- Whisk together coconut flour, baking soda, baking powder and salt.
- Add 1/2 of the dry mixture to the butter mixture and incorporate well.
- Add the sour cream and incorporate well.
- Add the remaining dry mixture and incorporate well, scraping down the sides of the bowl.
- Add the cocoa mixture and incorporate well.
- Pour the batter equally into 12 cupcake tins that have been lined with FOIL LINERS and sprayed with non-stick spray. (I use a 1.5 ounce scooper to get the right amount). Smooth the top of the cupcakes with a spatula.
- Bake for approximately 20 minutes, rotating the pan halfway. Use a toothpick to check for doneness.
- Let cool in the pan for 10 minutes, then turn out onto a cooling rack and cool completely before frosting.
Nobody wants to eat a plain cupcake, though. Try this frosting recipe on yours, weighing in at 1.26 grams of net carbs per serving. The recipe is based on the traditional method of making a buttercream, except, using cream cheese instead of butter. I did it this way because this method allows you to use a granulated sweetener instead of something that is powdered. It takes some effort, but you can definitely do it :) LCHF Coconut Cream Cheese Frosting (Frosts 12 Cupcakes) Ingredients: - 2 egg whites
- 1/3 cup Truvia
- 8 oz of softened cream cheese, cut into cubes
- 3/4 cup unsweetened coconut
Directions: - You are going to use a double boiler here: put about 1" of water into a saucepan and bring to a boil. Reduce the heat to a simmer once you reach a boil. Use the metal bowl from your mixer as the top of your double boiler. Note: the water should not touch the bottom of the metal mixing bowl.
- Add your egg whites and Truvia to the mixing bowl atop your double boiler and whisk vigorous for about 3 minutes, until they are hot and slightly frothy (your arms will also feel hot and slightly frothy at this point).
- Remove the mixing bowl from the heat, and affix it to your stand mixer. If you don't have a stand mixer, you are going to want to use handheld beaters instead of mixing by hand! Trust me!
- Beat the egg white mixture until the outside of the bowl is cool to the touch, about 3-5 minutes.
- Then, start adding the cream cheese, one cube at a time, to the egg white mixture. Make sure that each cube is well incorporated before adding the next cube.
- Add your coconut and mix to incorporate.
- Spread on cooled cupcakes and enjoy. You can sprinkle a little extra coconut on top for decoration, like I did in the picture.
DON'T EAT THE ENTIRE BATCH AT ONCE. There is a lot of dietary fiber in this recipe. There is also a decent amount of artificial sweetener. Hey, that's what you get when you make a full-sized cupcake that has fewer than 5 grams of net carbs in it. The combination of dietary fiber and artificial sweetener can produce some gastrointestinal distress. So, enjoy modestly. DO THIS INSTEAD: Freeze your cool, unfrosted cupcakes in a plastic baggie. Stuff your frosting in the fridge. Defrost the cupcakes as desired, then frost and eat. The frosting will last about a week in the fridge before you have to throw it out. Bon Appetit!
|
 RSS Feed